InstaSprink Estimate · Residential sprinklers
A priced sprinkler estimate, from floor plan to PDF in minutes.
Drop the heads by eye on the customer's own PDF, let the tool pipe them, add the supply, and download the quantities with your own costs against every line.
- Heads by eye
- Pipework laid out for you
- Your own prices
- Nothing to install
Download the InstaSprink Estimate brochure
Already have an account? Sign in at app.instasprink.com
Overview
Count faster. Price it once. Send it the same day.
InstaSprink Estimate takes a quote from the architect's PDF to a priced materials and labour list in six steps. Coverage boxes size the rooms, auto pipe routes the main, branches and riser, and the fittings, clips and pipe lengths come from the layout. Your prices are kept in one list and used on every estimate, so the total is yours, not a guess.
Start from any PDF
Every page becomes a floor. Crop off the title block, or mark several floors on one sheet, and set the scale.
Heads placed by eye
Each head shows its maximum coverage as a box, so a room is filled without measuring it.
Pipework laid out
One press routes a central main, branches chaining through the heads, and a riser linking the floors.
Supply counted too
AquaGuard pump sets built in, plus tank, valve set, PDV and anything of your own, each priced as a line.
Your prices, one list
Import the IPS costing sheet or type net costs into My Costings, shared by every estimate.
A PDF to send
Summary by floor, materials and labour with totals, your notes, and the marked-up plans with the pipe routes.
Made for the quote stage. For pricing houses, flats and small blocks before anything is designed — no hydraulic calculations and nothing to draw by hand. When the job lands, design it properly in InstaSprink Design or InstaSprink for AutoCAD.
Drawings and scale
Start from the plans you already have
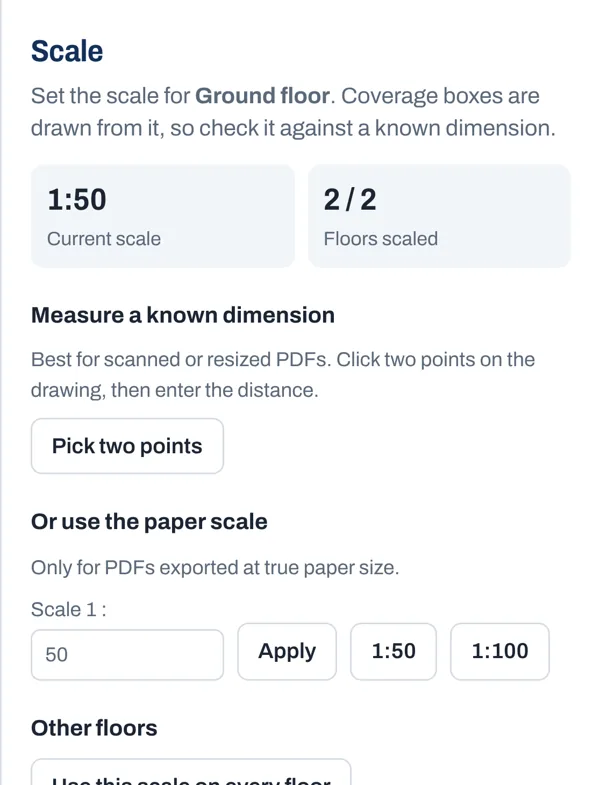
Import the PDF plans and every page becomes a floor. Name the floors, put them in order, then set the scale: pick the paper scale for a PDF exported at true size, or click two points on a dimension you can read and type the distance.
- Title block in the way? Crop a floor to just its plan; anything already placed stays where it is
- Several floors on one sheet — drag a box round each plan and say which floor it is
- Project, client and reference go on the estimate and the PDF, so it matches your quote
- Floor-to-floor heights on each card set the riser length between floors
Sprinkler heads
Drop the heads. The boxes do the measuring.
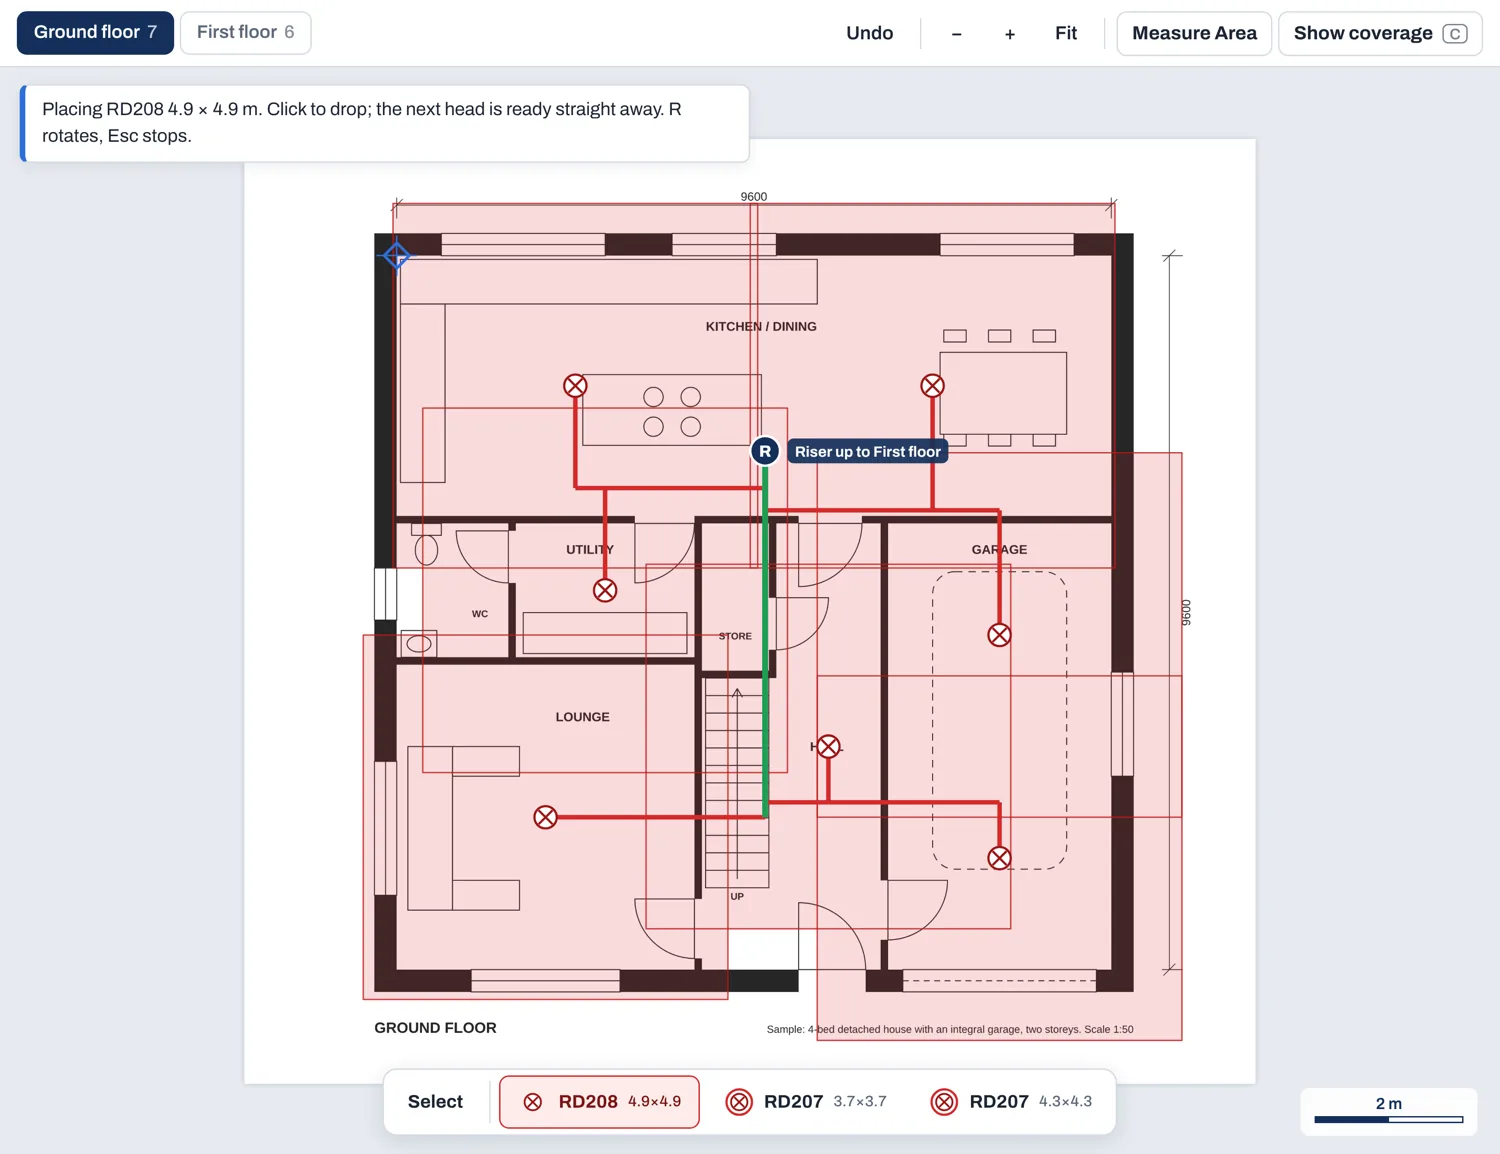
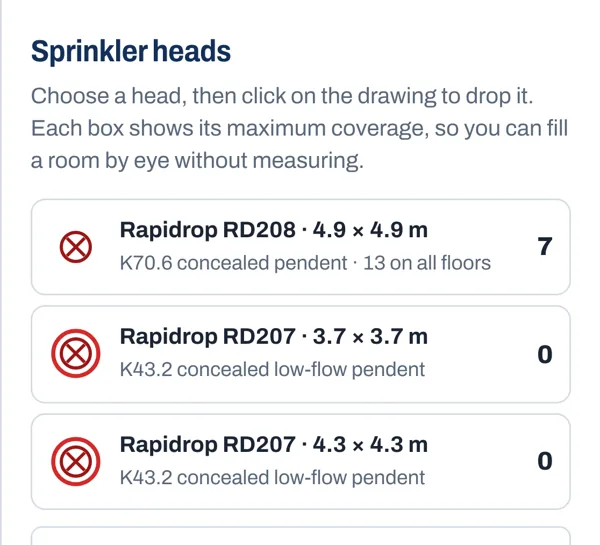
Choose a head, then click on the drawing to drop it. Each head shows its maximum coverage as a box, so you fill a room by eye. The next head is ready straight away, R rotates it, and heads line up with each other as you place them.
- Head library with Rapidrop RD208 and RD207 presets; tick the heads you use and the choice is kept
- Bathrooms and cupboards: Measure Area checks whether a bathroom (up to 5 m²) or cupboard (up to 2 m²) can go without a sprinkler
- Swap or clear — rotate, delete or clear a floor's heads in one press; Undo brings them back
Pipework and risers
Pipework, laid out for you
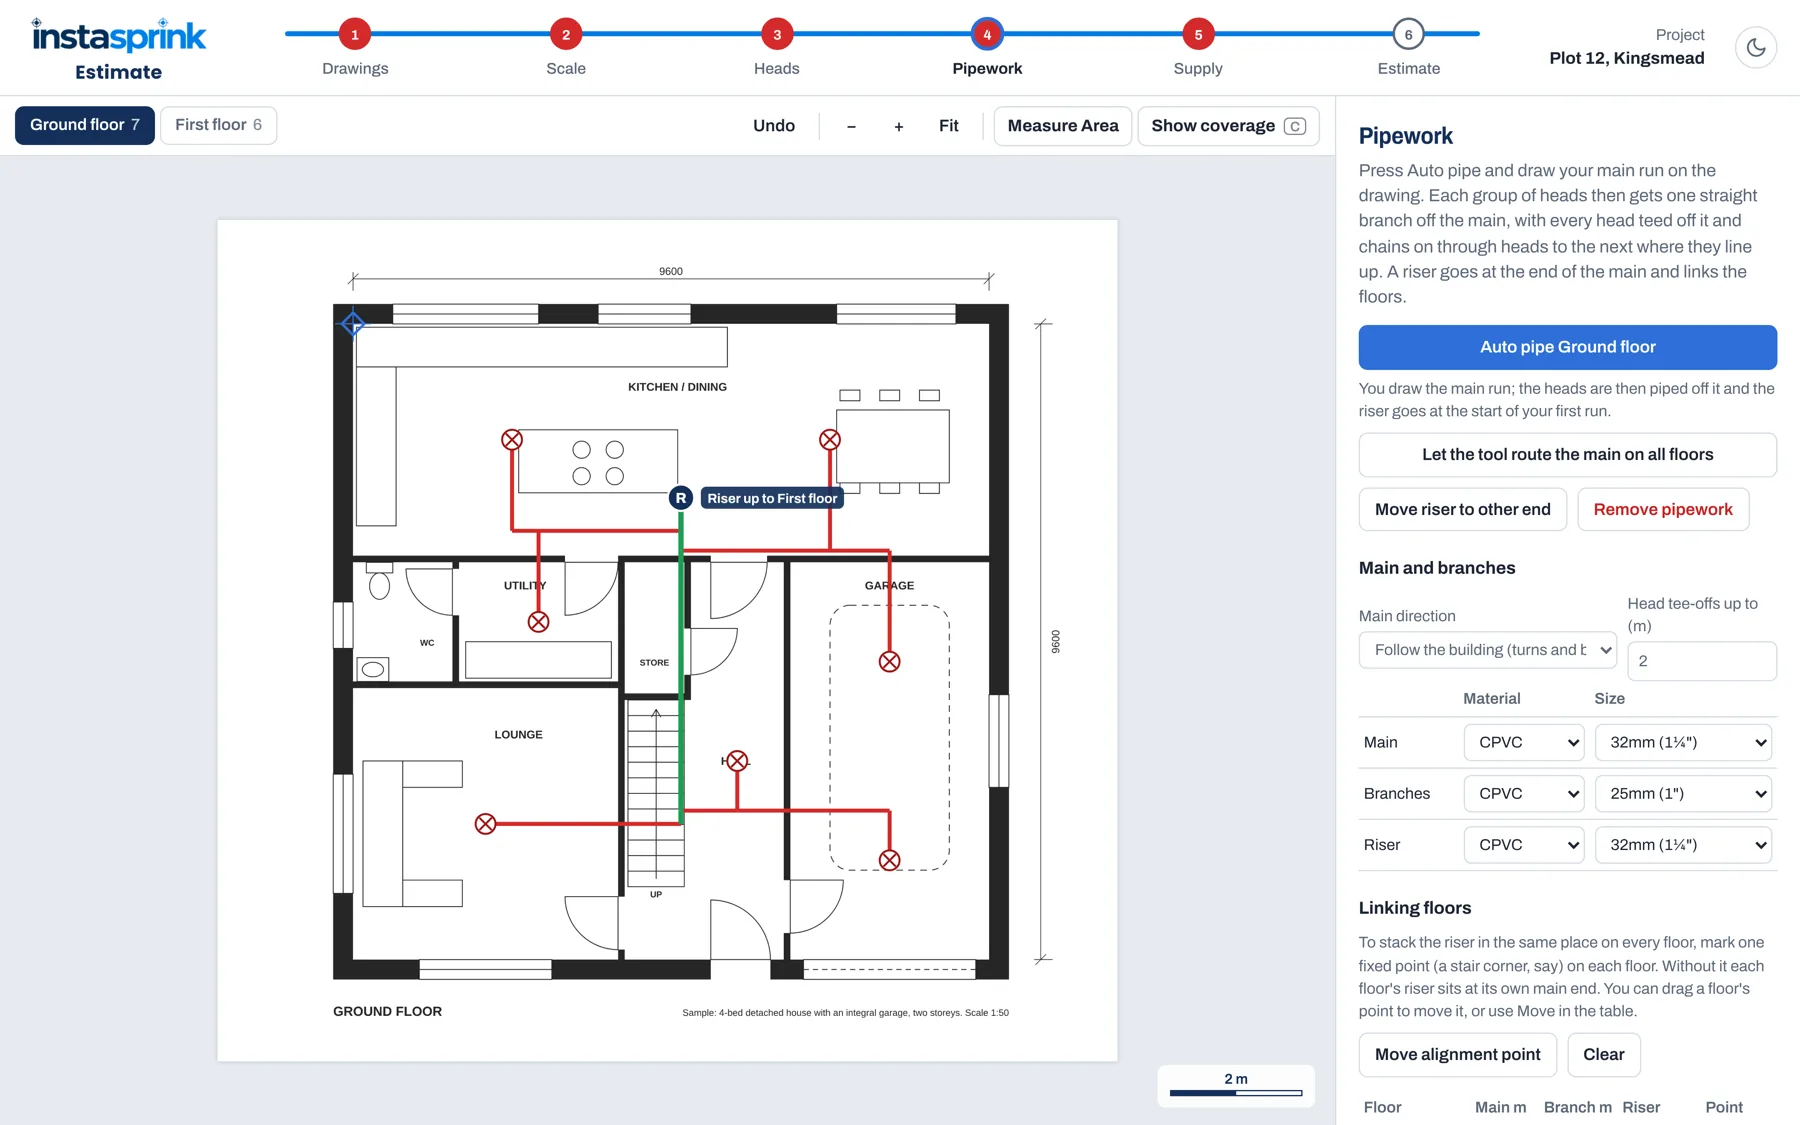
Press Auto pipe. Each group of heads gets one straight branch off the main, every head is teed off it and chains on through the next heads where they line up, and a riser goes at the end of the main to link the floors. Every tee, elbow and clip is counted.
- Or draw the main yourself and the heads are piped off it
- CPVC or steel, mixed if needed, 20 to 80 mm, with a transition fitting where they meet
- Linking floors: mark one fixed point on each floor and the riser stacks in the same place
- Head drops of 200 mm to a sprinkler adaptor on every head, with the elbow counted
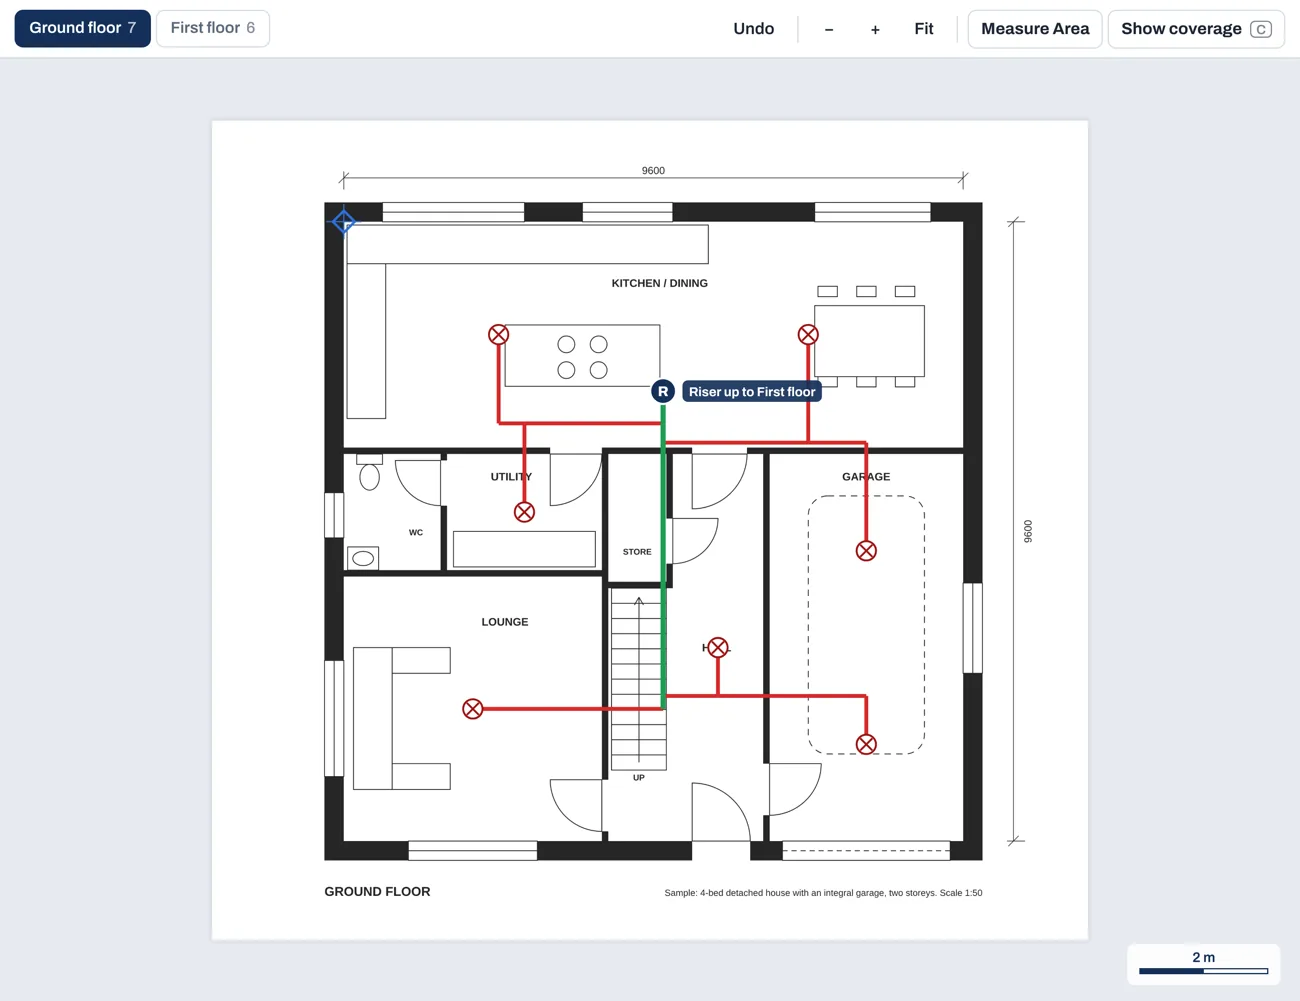
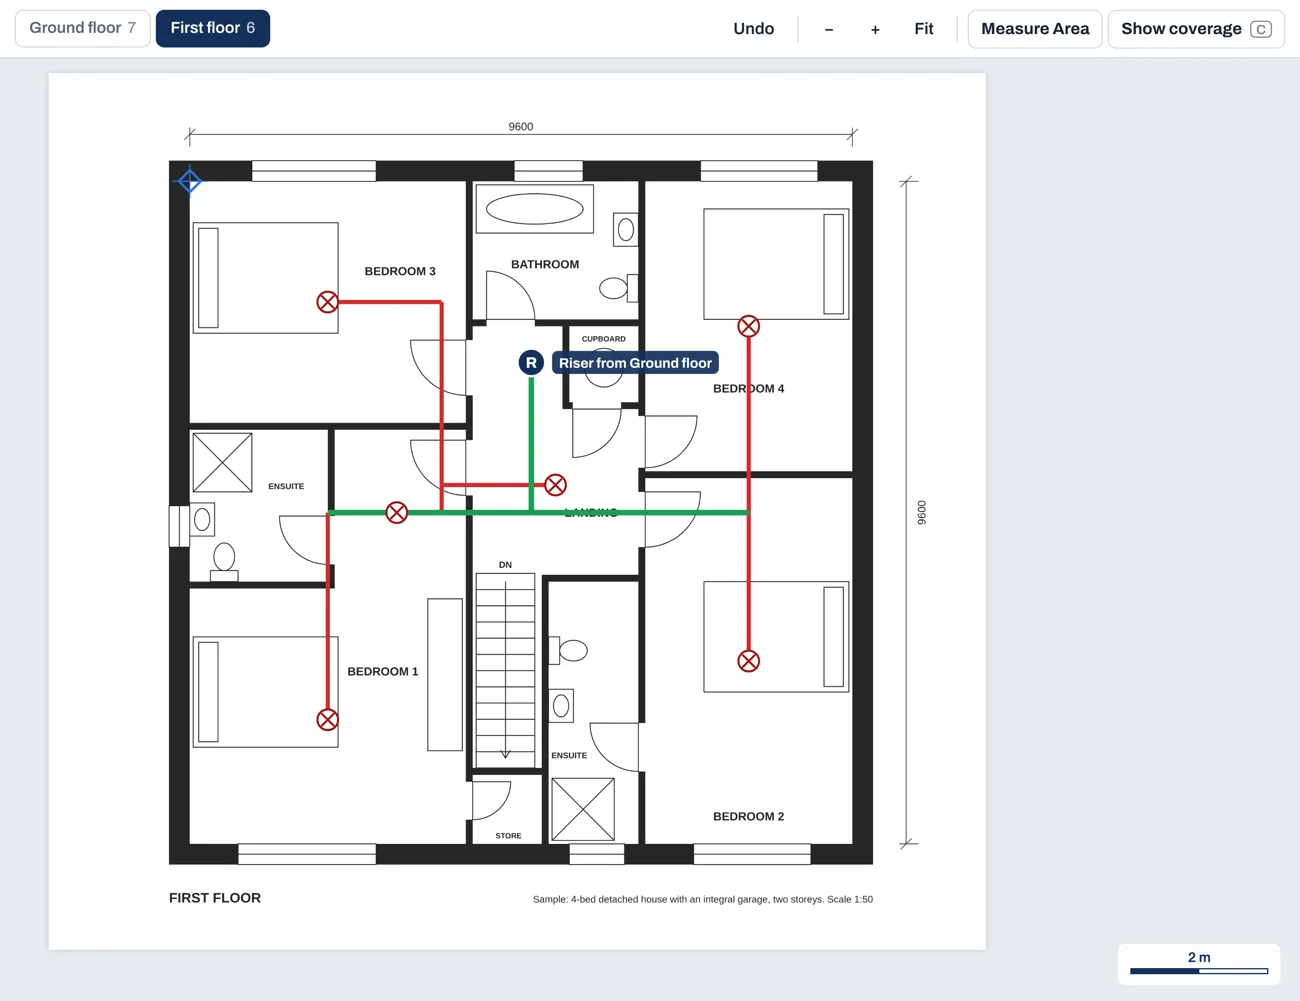
Ground floor with a 32 mm main and 25 mm branches; first floor with the riser in the same place.
Supply
The supply, counted and priced
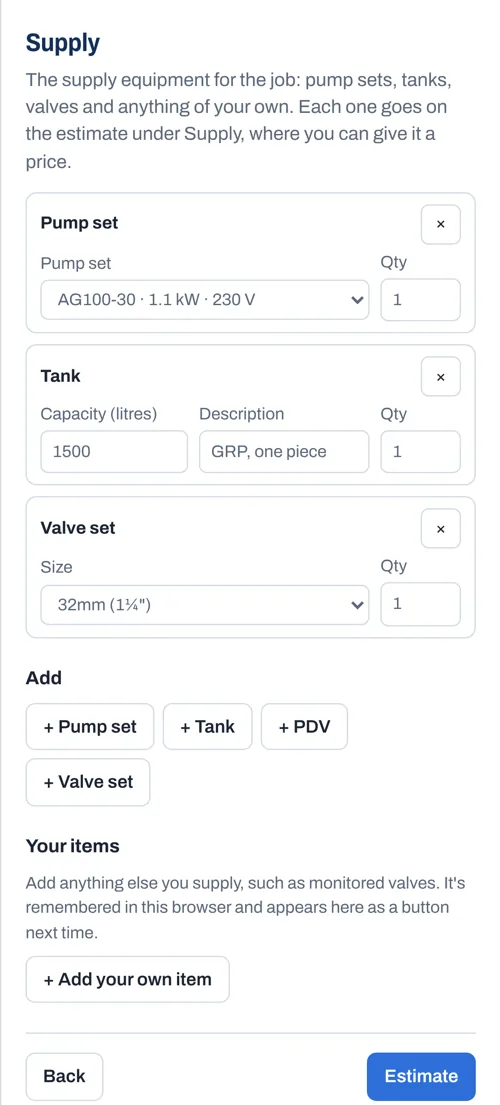
Add the supply equipment for the job and each item becomes a line under Supply on the estimate, where you give it a price: pump sets, tank, valve set, PDV, and anything else you supply.
- AquaGuard pump sets built in — the AG75, AG100 and AG150 ranges, 230 V single phase, 19 models
- Add your own pump, kept and offered again on the next estimate
- Tank by capacity in litres; valve set and PDV from the standard pipe sizes
- Your own items — monitored valves, flow switches, anything else — added once, a button next time
Estimate and PDF
A priced estimate, ready to send
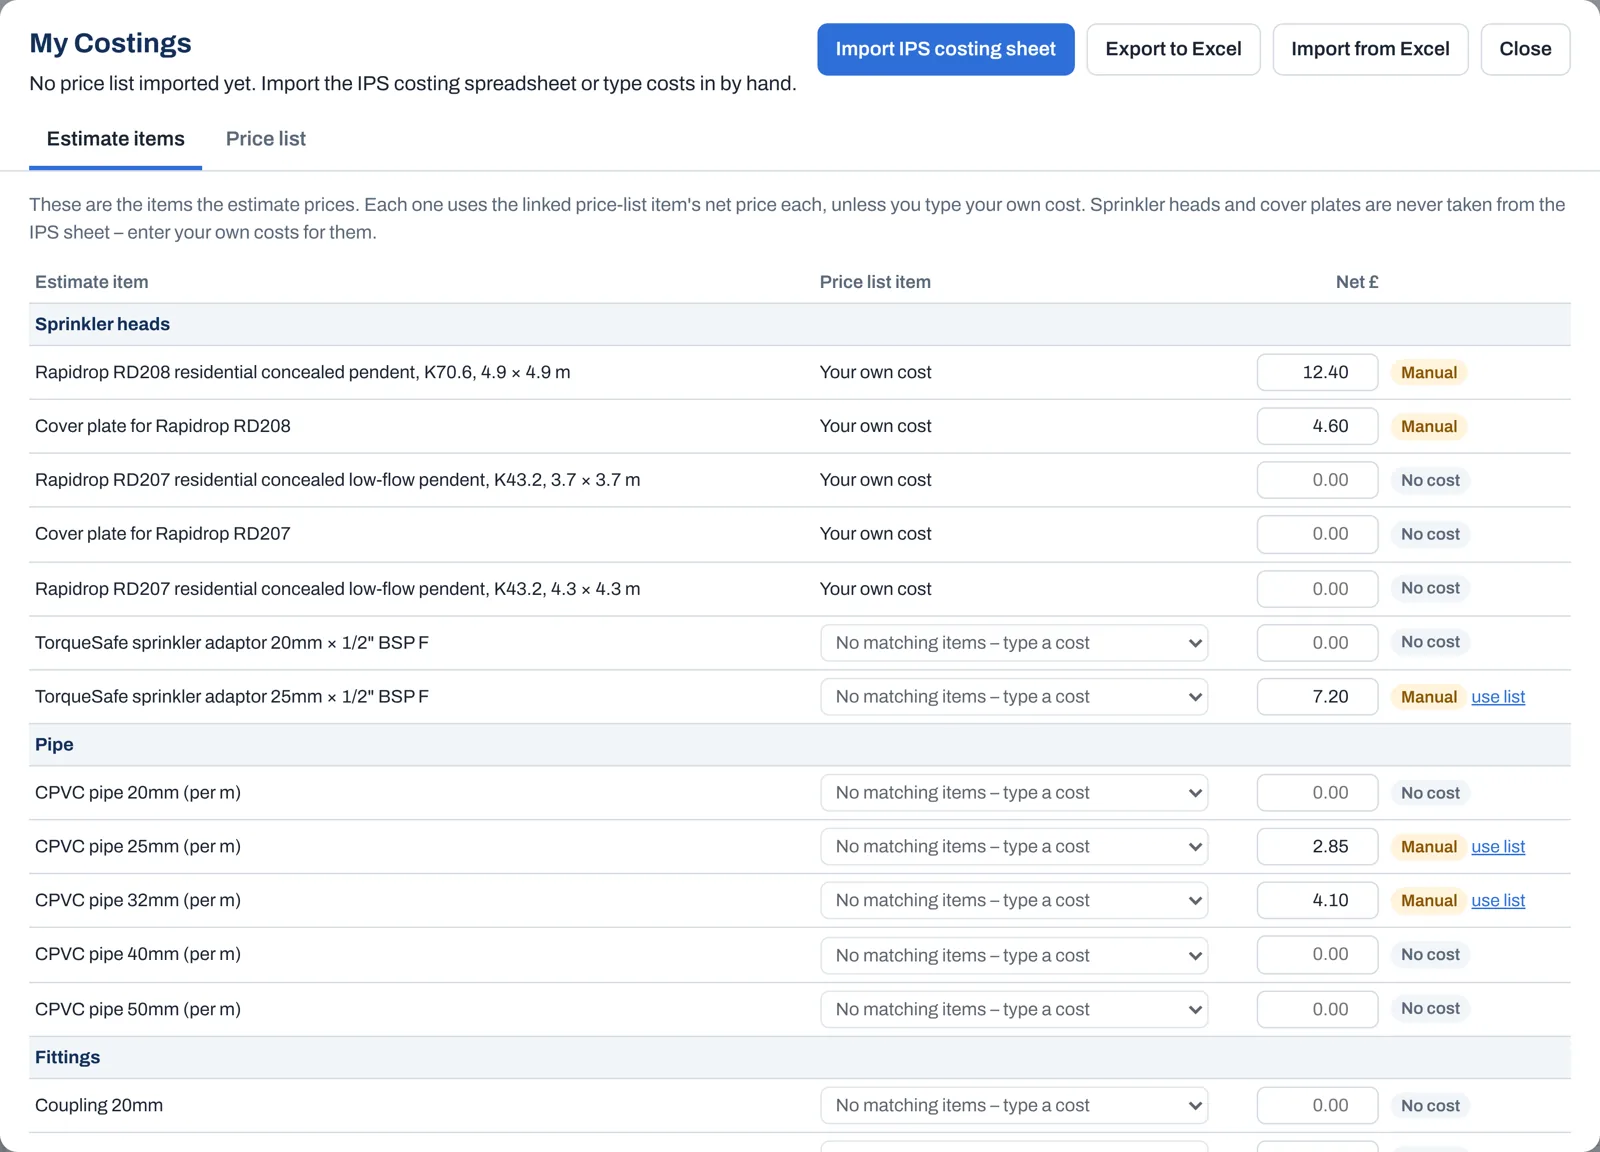
Quantities from every floor, grouped as sprinkler heads, pipe, fittings, supports, riser, supply and labour. Costs come from My Costings, or type a net cost straight into the list, and download the PDF.
- Counted from the layout: pipe in 3 m lengths with your waste allowance, tees and elbows at every junction, head drops with adaptors, clips at your hanger spacing
- Labour too: first and second fix per head, design, and your own extras, so the total is the whole job
- My Costings — your price book: import the IPS costing sheet, link or type items, export to and import from Excel
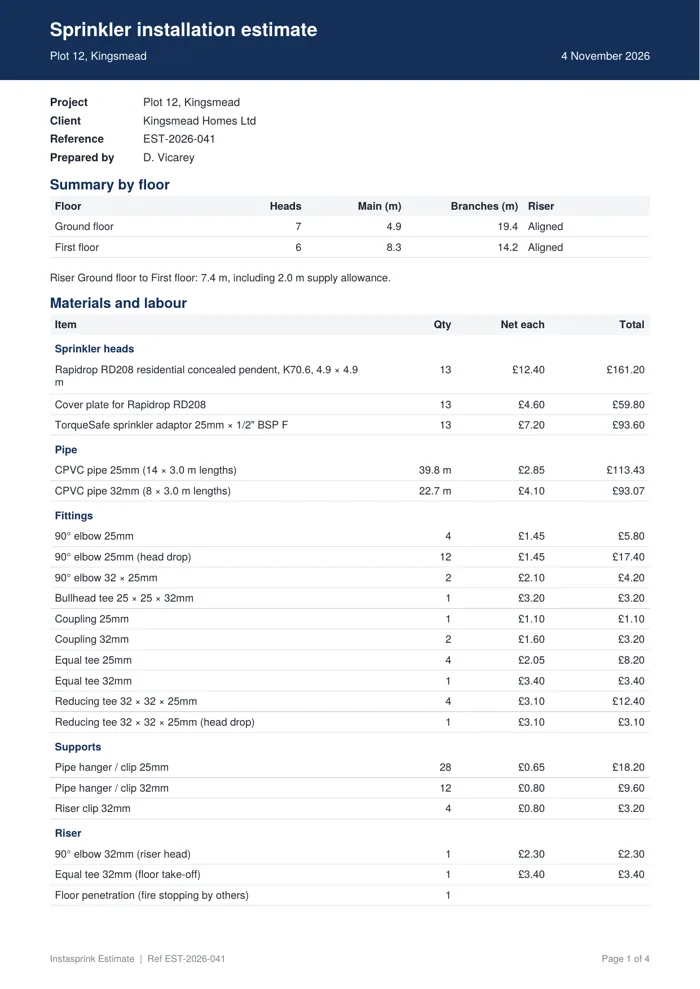
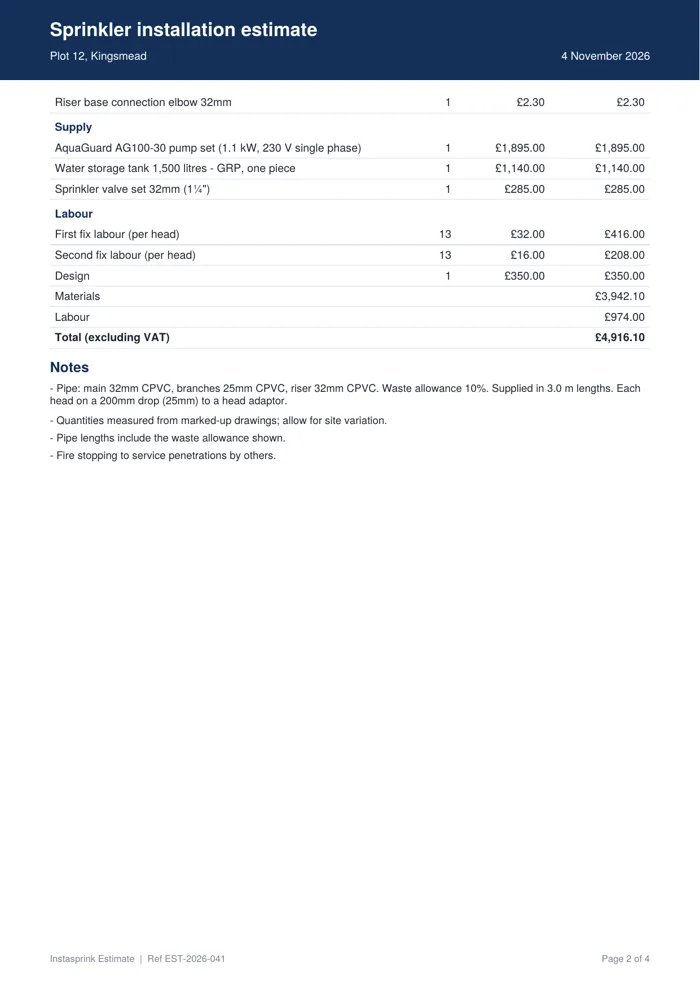
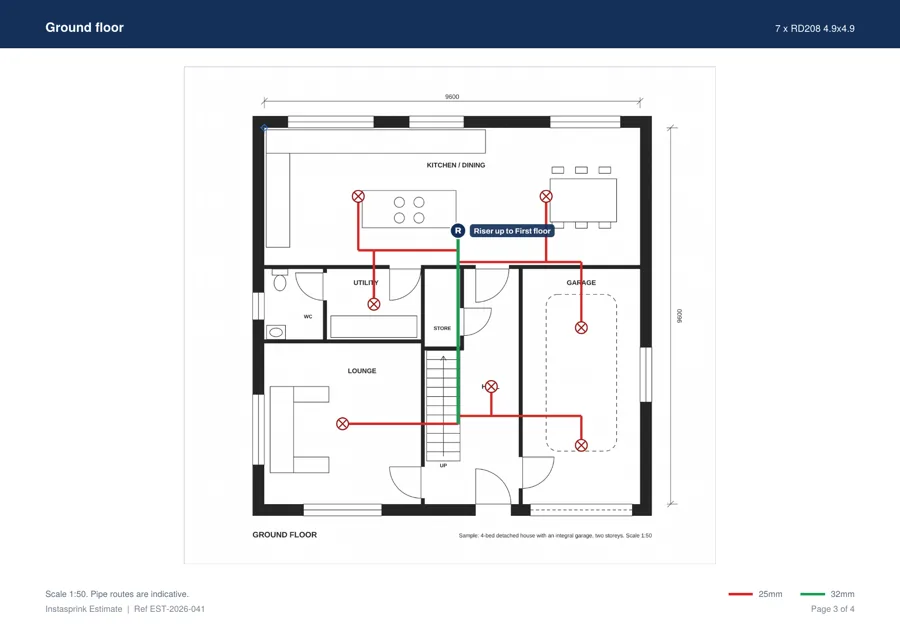
The PDF: summary by floor and materials · supply, labour, totals and notes · every floor with its pipe routes.
Built for the way you work
Nothing to install. Your whole team on one login.
Runs in your browser
On a PC, Mac or tablet. Estimates save to your company account, ready to pick up anywhere.
One login for every tool
The same account opens Design, Estimate, Markup and the AutoCAD plugin, each with its own projects and folders.
Kept safe
A 30-day bin for deleted estimates and a nightly backup. Owners and admins see every estimate in the company.
Included with Design
Free with every InstaSprink Design and AutoCAD seat, and in the Package. Also available on its own.
Your prices stay yours
My Costings is kept on your computer. Import the IPS sheet, edit it, export it to Excel.
Light or dark
A switch in the top bar; the choice is kept on that device and shared with InstaSprink Markup.
From quote to design. An estimate is the quick count for the quote. When the job lands, open InstaSprink Design on the same account and design it properly to BS 9251:2021, with the hydraulics calculated and the drawings ready to issue.
Try it on your next quote
Start your free 14-day trial of InstaSprink Estimate
Create an account at app.instasprink.com and start a full trial, so you can price a real job from the plans you already have.
- info@instasprink.com
- Sign up or sign in
- app.instasprink.com
- Web
- instasprink.com
Quantities are measured from marked-up drawings and are indicative; allow for site variation. Prices shown are illustrative. Licences are per named user, monthly or annual, and can be cancelled at any time. Screens show a sample project. Rapidrop and AquaGuard are trademarks of their respective owners.